Setup
In this prelab, you will learn one of the most popular Javascript frontend frameworks, Vue.js .
Warning: This prelab is
a lot
on the longer side, but is incredibly useful to complete. Note: there is not a handin for this prelab, but it is still very, very useful, so please do it!
Introduction
What's Vue.js
From Vue's offcial guide:
Vue (pronounced /vjuː/, like view) is a progressive framework for building user interfaces. Unlike other monolithic frameworks, Vue is designed from the ground up to be incrementally adoptable. The core library is focused on the view layer only, and is easy to pick up and integrate with other libraries or existing projects. On the other hand, Vue is also perfectly capable of powering sophisticated Single-Page Applications when used in combination with modern tooling and supporting libraries .
If there are a lot of buzz words in this introduction that does not make sense to you, no worries, you will get to know Vue better through this module. For now, think Vue as a more modular way to package HTML, CSS, Javascript into reusable components.
Why we chose Vue (optional reading)
You might have heard of other frameworks like React or Angular. If you are wondering why we choose Vue for the Javascript Framework section of our course, here is a short explanation.
-
Compared to React
-
React takes a
everything in Javascript
approach. In React, you will write the UI as a HTML-like parameter to the render function.// this part declares the template class HelloMessage extends React.Component { render() { return ( <div> Hello {this.props.name} </div> ); } } // this part provides data binding ReactDOM.render( <hellomessage name="Taylor">, // implicitly bind the data as prop (argument) document.getElementById('hello-example') // which element to *mount* upon );In comparison, Vue provides additional syntax on top of plain HTML which might feel more natural to read.
// HTML part declares the template
<div id="app">
    Hello {{message}}
</div>
// JS part provides data binding const app = new Vue({ el: '#app', // which element to *mount* upon data: { message: 'Vue!' // explicitly binds the data as field } });As you can probably tell from the previous two code examples, Vue could also be easier to integrate into existing projects.
-
React is renowned for its steep learning curve where you need to learn a new set of syntax and build systems.
In comparison, you are exposed to most of Vue's features by dropping a single script tag into the page:
<script src="https://cdn.jsdelivr.net/npm/vue"></script>Then you can start writing Vue code!
-
Compared to Angular
-
Angular essentially requires Typescript , which provides static type checking (think Java) that can be very useful for large-scale applications and editor support. However, introducing a type system unavoidably result in more overhead in smaller-scale use cases and requiring a build system to transpile Typescript code into plain Javascript code that browsers can understand.
-
Angular’s learning curve is even steeper. The API surface of the framework is huge and as a user you will need to familiarize yourself with a lot of concepts before getting productive. The complexity of Angular is largely due to its design goal of targeting only large, complex applications, which does make the framework a lot more difficult for less-experienced developers to pick up.
Prelab Overview
This prelab will help you learn Vue by procedualy implementing part of a fun tic-tac-toe game using cherry-picked Vue basics we find useful for your lab and assignment. In addition, we highly recommend you to read the nicely-written Essentials Section in official guide for a more thorough understanding.
Learning Strategies (optional reading)
Feel free to:
- read the prelab and the official guide ( Awesome! You are a Vue pro now )
-
only read the official guide ( Totally acceptable! This guide is closely modeled after Official Guide after all. You get everything needed!)
-
only read the prelab ( Thanks for your trust in us! This guide should give you enough information for finishing lab and assignment.)
-
read nothing (
I sure hope you know what you are doing
)
Installation
There are two ways to use Vue:
-
Use direct
<script>Include. - Use a build system.
The first way is suited for smaller-scale projects and quick prototyping while the latter for larger-scale applications and consequently requires much more setup.
In this prelab, we will use the script tag approach for a quicker start and introduce build system as an optional read. For the lab and assignment, you are free to choose any setup.
Setup
-
To start with, create an empty directory. For example, to create a git-tracked directory, you can use
git init vue-prelab. -
Set up ESLint for Vue (optional reading)
Inside the directory, run
-
npm initto enable npm in the directory. Feel free to click Enter to accept the defaults. -
npm i -D eslint eslint-plugin-vue babel-eslintThis script will install eslint and eslint-vue dependencies, where-
iis shorthand for install -
-Dis a shorthand for--save-devwhich stands for installing as dev dependencies -- meant for packages that are only needed for local development and testing. To read more about the difference between normal dependencies and dev dependencies, read This StackOverflow post explaining the difference
-
-
Choose one of the following
-
Run
eslint --initand step through the questions.
-
Create a new file called
.eslintrc.jsand copy in the following (modified after Setting up ESLint for a Vue.Js Project Using VS Codemodule.exports = { root: true, env: { // this section will be used to determine which APIs are available to us // (i.e are we running in a browser environment or a node.js env) browser: true }, parserOptions: { parser: "babel-eslint", // specifying a module sourcetype prevent eslint from marking import statements as errors sourceType: "module" }, extends: [ // use the recommended rule set for both plain javascript and vue "eslint:recommended", "plugin:vue/recommended" ], rules: { // we should always disable console logs and debugging in production "no-console": process.env.NODE_ENV === "production" ? "error" : "off", "no-debugger": process.env.NODE_ENV === "production" ? "error" : "off" } };
-
Run
- Make sure you have installed the ESLint plugin on VSCode , mentioned in the assignment0.
-
-
Create an HTML file and
copy the following
, modified after
Bootstrap's starter template
<!doctype html> <html lang="en"> <head> <!-- Required meta tags --> <meta charset="utf-8"> <meta name="viewport" content="width=device-width, initial-scale=1, shrink-to-fit=no"> <!-- Bootstrap CSS --> <link rel="stylesheet" href="https://stackpath.bootstrapcdn.com/bootstrap/4.4.1/css/bootstrap.min.css" integrity="sha384-Vkoo8x4CGsO3+Hhxv8T/Q5PaXtkKtu6ug5TOeNV6gBiFeWPGFN9MuhOf23Q9Ifjh" crossorigin="anonymous"> <!-- Always give your HTML file an appropriate title --> <title>Tic-Tac-Toe</title> </head> <body> <!-- Mounting element for the Vue instance later created with new Vue --> <div id="app"> <!-- Notices the same id and el--> {{ message }} </div> <!-- Optional JavaScript --> <!-- jQuery first, then Popper.js, then Bootstrap JS --> <script src="https://code.jquery.com/jquery-3.4.1.slim.min.js" integrity="sha384-J6qa4849blE2+poT4WnyKhv5vZF5SrPo0iEjwBvKU7imGFAV0wwj1yYfoRSJoZ+n" crossorigin="anonymous"></script> <script src="https://cdn.jsdelivr.net/npm/popper.js@1.16.0/dist/umd/popper.min.js" integrity="sha384-Q6E9RHvbIyZFJoft+2mJbHaEWldlvI9IOYy5n3zV9zzTtmI3UksdQRVvoxMfooAo" crossorigin="anonymous"></script> <script src="https://stackpath.bootstrapcdn.com/bootstrap/4.4.1/js/bootstrap.min.js" integrity="sha384-wfSDF2E50Y2D1uUdj0O3uMBJnjuUD4Ih7YwaYd1iqfktj0Uod8GCExl3Og8ifwB6" crossorigin="anonymous"></script> <!-- Include Vue from a CDN --> <!-- development version, includes helpful console warnings --> <script src="https://cdn.jsdelivr.net/npm/vue/dist/vue.js"></script> <!-- the following script requires Vue to be imported so comes after --> <script src="tic-tac-toe.js"></script> </body> </html> -
Creates a JS file named
tic-tac-toe.js( If you choose custom name, remember also to rename the HTML script import. ) and copy the following .const app = new Vue({ el: '#app', data: { message: 'Hello Vue!' } });
Now if you open this file in browser, you should see an empty page with Hello Vue! .
Notice how Vue.js is imported before it is used in
tic-tac-toe.js
.
Guide
The Vue Instance
Note in the `tic-tac-toe.js`, we have something like:
const app = new Vue({
    el: '#app',
    data: {
        message: 'Hello Vue!'
    }
});
Every Vue application starts by creating a
new root Vue
instance using
new Vue
.
-
Vue instance
reflects the fact that it is created with
new Vue. Think of Java'snew Class. -
root reflects the fact that it is the outermost node in the component tree. Think of the root node of tree.
For example, a todo app’s component tree might look like this:
app <---- Root Instance └─ TodoList ├─ TodoItem │ ├─ DeleteTodoButton │ └─ EditTodoButton └─ TodoListFooter ├─ ClearTodosButton └─ TodoListStatisticsComparing to DOM tree of HTML documents, you can think this organization as a virtual DOM tree of components. It facilitates the separation of view layer (concrete HTML elements) and view model layer (components relating to app logic). You can read more about this MVVM software architecture pattern .
Note the curly brace inside
new Vue()
:
When you create a Vue instance, you pass in an options object. The majority of this guide describes how you can use these options to create your desired behavior. For reference, you can also browse the full list of options in the API reference .
You can think
Vue
as a factory method and the argument is a configuration object, this pattern is very common in Javascript libraries.
In our starter JS template, two fields have been provided to
new Vue
:
-
elThis provides the Vue instance an existing DOM element to mount on. It can be a CSS selector string or an actual HTMLElement.
( optional reading ) The reason we mount the app on div instead of body comes from the following caveat.The provided element merely serves as a mounting point. Unlike in Vue 1.x, the mounted element will be replaced with Vue-generated DOM in all cases. It is therefore not recommended to mount the root instance to
<html>or<body>. -
dataBefore revealing what this field is doing, notice how the
messageis a string insidedataand used in the corresponding mounted HTML element<div id="#app"></div>as if it is a variable.Now try a small experiment, change the message string inside
datafield to'Welcome to the game!', save the file, and refresh the page in browser. Does it do what you expect?When a Vue instance is created, it adds all the properties found in its data object to Vue’s reactivity system. When the values of those properties change, the view will
react
, updating to match the new values. Basically, when provided data changes, the view will re-render.To better appreciate how powerful this reactivity is, add this line to the end of tic-tac-toe.js
window.setTimeout(() => app.message = "Ready to get started?", 1000);Save the JS file and refresh the page, you should see the message changed after 1 second. After the Vue instance is created, data properties become direct properties on the instance. That's why you can refer to
messagedata property directly using dot syntax likeapp.messageas ifmessageis a property on the app Vue instance .Caveat:
It should be noted that properties in data are only reactive if they existed when the instance was created. In other words, once observed, you can no longer add reactive properties to the root data object. It is therefore recommended to declare all root-level reactive properties upfront, before creating the instance.
In practice, this limitation is often alleviated by the following approaches:
- declare needed outermost level of data object in initialization
-
leverage data structure like array and object.
( Try it out ) make the following changes to both files then refresh and observe the change.
<div id="app">
    {{ message }} {{playerNames[0]}}, {{playerNames[1]}}
</div>
const app = new Vue({ el: '#app', data: { message: 'Welcome to the game!', playerNames: [] }, }); window.setTimeout(() => { app.message = "Ready to get started?" app.playerNames.push("Alice", "Bob"); }, 1000);You should see
Welcome to the game! ,first and then seeReady to get started? Alice, Bobafter 1 second.
In addition to data properties, Vue instances expose a number of useful instance properties and methods.
For example,
$el
refers to the root DOM element that the Vue instance is managing. In the
app
instance,
app.$el
refers to the div element with id
app
.
In the future, you can and should consult the API reference for a full list of instance properties and methods.
Lifecycle
People gone through different stages of life. A similar analogy can be drawn for Vue instances. The instance is created, mounted onto DOM, about to be updated, about to be destroyed...
Vue provides functions called lifecycle hooks that will be executed at corresponding stages. Think it as event listeners for Vue instance events.
To illustrate how this ability to inject custom code in specific stages of instance can be helpful, think about an video player: at before playing it might need to get authenticated to know where to fetch video from and before closing it might need to tell the server to stop streaming.
Below is a diagram for the instance lifecycle . You don’t need to fully understand everything going on right now, but as you learn and build more, it will be a useful reference.

Template Syntax
You might have noticed the double curly brace syntax in the HTML file:
{{ message }} {{playerNames[0]}}, {{playerNames[1]}}
This double curly brace syntax is also known as moustache syntax .
The mustache tag will be replaced with the value of the named property on the corresponding data object. For example,
message
will be replaced by
'Welcome to the game!'
when page first loads up.
Moreover, when the data object's
message
changes to
"Ready to get started?"
, Vue will intelligently figure out how to re-render the page and do the DOM manipulations optimally.
Since Vue.js uses an HTML-based template syntax that allows you to declaratively bind the rendered DOM to the underlying Vue instance’s data, all Vue.js templates are valid HTML that can be parsed by spec-compliant browsers and HTML parsers.( optional reading ) Caveat for rendering raw HTML :
The double mustaches interprets the data as plain text, not HTML. In order to output real HTML, you will need to use the v-html directive are preferred than rawHTML as the fundamental unit for UI reuse and composition.
Dynamically rendering arbitrary HTML on your website can be very dangerous because it can lead to XSS vulnerabilities . Only use HTML interpolation on trusted content and never on user-provided content.
Besides binding data inside HTML tag, you can also bind data in HTML attribute. Make the following changes to your code:
<div id="app">
    <h1><a v-bind:href="ticTacToeWikiPage"> Tic Tac Toe</a></h1>
    {{ message }} {{playerNames[0]}}, {{playerNames[1]}}
</div>
const app = new Vue({
    el: '#app',
    data: {
        ticTacToeWikiPage: "https://en.wikipedia.org/wiki/Tic-tac-toe",
        message: 'Welcome to the game!',
        playerNames: []
    },
});
Try click on the
h1
title link, does it do what you expect?
To avoid dealing with casing, please try use
camel casing
like
ticTacToeWikiPage
to name your variables.
As you might come to expect, you can use the full power of Javascript expressions in all data bindings. For example, to avoid displaying player names before we actually have them, we can use a tenary expression:
<div id="app">
    <h1><a v-bind:href="ticTacToeWikiPage">Tic Tac Toe</a></h1>
    {{ message }} {{playerNames.length? `${playerNames[0]}, ${playerNames[1]}` : ''}}
</div>
Inside backquotes
``
, you can escape Javascript expression using
${}
syntax.
Directives
The
v-bind
attribute are referred as
directives
in official documentation. Directives are special attributes with the
v-
prefix, whose job is to reactively apply side effects to the DOM when the value of its expression changed.
For example, the expression for
v-bind
is the data attribute
ticTacToeWikiPage
, if we modified the address, the link element will then point to a different URL.
The colon
:
signifies that this directive takes an argument. In this example,
v-bind
's argument is
href
, meaning that we are binding a Javascript expression to a normal HTML attribute
href
. You can think
v-bind:
as a Vue sticker, its presence telling Vue engine to bind the upcoming Javascript expression's value to the attribute.
List Rendering
Vue also provides some enhancements beyond normal HTML syntax. In this section, we will get you familiar with
v-for
, an iteration protocol to display a list of items.
<div id="app">
    <h1><a v-bind:href="ticTacToeWikiPage">Tic Tac Toe</a></h1>
    {{ message }} {{playerNames.length? `${playerNames[0]}, ${playerNames[1]}` : ''}}

    <div id="board">
        <div v-for="r of 3" v-bind:key="`row-${r}`" class="board-row">
            <div v-for="c of 3" v-bind:key="`cell-${r}-${c}`" class="board-cell"></div>
        </div>
    </div>
</div>
Refresh and open DevTools, can you find the 9
<div>
with
board-cell
class?
v-for="r of 3"
and
v-for="c of 3"
does the magic here:
v-for
makes the current template it is attached to repeated in a certain way. In this case,
3
is a range.
board-row
is repeated three times with
r
or
c
taking values from 1 to 3, each time rendering
board-cell
three times, accounting for the 9
board-cell
.
It is recommended to provide akeyforv-forwhenever possible, so that Vue can track each node's identity in reusing and reordering existing elements.
Think
key
as Vue's version of
id
, it is often good practice to supply them when using
v-for
. Feel free to read
Key section in List Rendering
for explanation on why and when to supply the
key
attribute.
Class and Style bindings
We already put the board on the page, however, it is invisible since we have not applied any styles!
Firstly, add the following style in the
<head>
to make
<html>
,
<body>
take up all available space (
A problem comes up more often than you thought
).
<style>
    html, body {
        width: 100%;
        height: 100%;
    }
</style>
Now, let us style our Vue instance.
A common need for data binding is manipulating an element's class list and its inline styles. Since they are both attributes, we can use
v-bind
to handle them.
Besides interpreting string expression, Vue provides enhancements when
v-bind
is used with
class
and
style
so that object and arrays can be valid expressions in class and style bindings.
Here we can make use of a bunch of Bootstrap classes to style where our Vue instance is bound to:
<div id="app" v-bind:class="['w-100', 'h-100', 'p-5', 'd-flex', 'flex-column', 'align-items-center']">
-
w-100is equivalent of{ width: 100% } -
h-100is equivalent of{ height: 100% } -
p-5applies some padding{ padding: 3rem } -
d-flexis equivalent of{ display: flex } -
flex-columnis equivalent of{ flex-direction: column } -
align-items-centeris equivalent of{ align-items: center }
HTML properties are usually double quoted, we are following this standard and single quoting the Bootstrap classes.
Similarly, you can bind style using a CSS-like syntax (the caveat is it is a Javascript object and often requires quoting on both attribute and value):
<div id="board" class="container m-auto" v-bind:class="'bg-light d-flex flex-column'" :style="{ 'width': '900px', 'height': '900px' }">
We set a fixed width for the board, however, a better approach would be using media query to accommodate different screen sizes.
Notice we quoted both
'width'
and
'900px'
, from the fact that they are inside a Javascript expression rather than inside a CSS file.
Besides, we demonstrated several other things:
-
:is a shorthand forv-bind:. -
You can use the normal
class="..."besidesv-bind:class="...". Vue will automatically merges these two, preserving all unique classes. (The same is true for style). -
containersee Bootstrap Containers -
m-autois equivalent of{ margin: auto } -
bg-lightspecifies a light background for the board
As mentioned earlier, the bound Javascript expression can be a data attribute name, thus avoiding the clutter of writing everything as plain string in HTML files.
Make the following changes to both files, you should see the a tic-tac-toe game board starts to appear!
<div id="board" class="container m-auto" v-bind:class="'bg-light d-flex flex-column'" :style="{ 'width': '900px', 'height': '900px' }">
    <div v-for="r of 3" v-bind:key="`row-${r}`" class="board-row" :class="boardRowClasses">
        <div v-for="c of 3" v-bind:key="`cell-${r}-${c}`" class="board-cell" :class="boardCellClasses"></div>
    </div>
</div>
const app = new Vue({
    el: '#app',
    data: {
        ticTacToeWikiPage: "https://en.wikipedia.org/wiki/Tic-tac-toe",
        message: 'Welcome to the game!',
        playerNames: [],
        boardRowClasses: ['row', 'flex-grow-1'],
        boardCellClasses: ['col', 'p-4', 'border', 'border-primary', 'rounded-lg'],
    },
});
Here are a short description of each Bootstrap class used:
row
represents a row in Bootstrap's grid system
flex-grow-1
means the flex item is able to grow to fill available space. Because the board has
d-flex
and
flex-column
, making board row
flex-grow-1
means each board row will attempt to take as much space as possible
col
means each cell is a equal-width column
p-4
applies some padding to each table cell
border
makes table cell bordered
border-primary
sets the border color to be
--primary
rounded-lg
applies a large border radius.
Conditional Styling
To make the board look even nicer, we will alternate the background color of board cells:
| # | Col1 | Col2 | Col3 |
|---|---|---|---|
| Row 1 | Cell 1 | Cell 2 | Cell 3 |
| Row 2 | Cell 4 | Cell 5 | Cell 6 |
| Row 3 | Cell 7 | Cell 8 | Cell 9 |
The following change will make the board striped!
<div
    v-for="c of 3"
    v-bind:key="`cell-${r}-${c}`"
    class="board-cell"
    v-bind:id="(r - 1) * 3 + c"
    :class="[{'bg-white': [2, 4, 6, 8].includes((r - 1) * 3 + c)} ,boardCellClasses]">
</div>
What's involved
-
Array.includesdetermines whether an array includes a certain value. -
(r - 1) * 3 + ccomputes the cells index, as Vue's range is 1-based. -
The object syntax
{ className: expression }means the presence of theclassNamewill be determined by the truthiness of theexpression. In this example, if the cell index is 2, 4, 6, 8, the cell will get abg-whiteclass. - It is a good practice to quote the key since special characters like hyphen is not allowed as plain object key name
- You can use object syntax in conjunction with array syntax to create more complifcated rendering for class and style
Components
You can probably tell that we are not writing elegant, maintainable code here:
- we wrote complicated Javascript expressions inside HTML file
- We do not fully utilize the object-oriented design principles to make our code more modular
Components are reusable Vue instances with a name.
For example, we can extract the
<h1>
element into a component named
game-title
:
// this is how to create a component that is globally registered
Vue.component('game-title', {
    template: `
        <h1>
            <a href="https://en.wikipedia.org/wiki/Tic-tac-toe">Tic Tac Toe</a>
        </h1>
    `,
});

const app = new Vue({
    el: '#app',
    data: {
        message: 'Welcome to the game!',
        playerNames: [],
        boardRowClasses: [ 'row', 'flex-grow-1'],
        boardCellClasses: ['col', 'p-4', 'border', 'border-primary', 'rounded-lg'],
    },
});
<div id="app" v-bind:class="['w-100', 'h-100', 'p-5', 'd-flex', 'flex-column', 'align-items-center']">
    <game-title></game-title>
    {{ message }} {{playerNames.length? `${playerNames[0]}, ${playerNames[1]}` : ''}}
A component can be registered using Vue.component .
-
The first argument is an
idindicating how this component wil be named. For example, since the id ofgame-titlecomponent is registered asgame-title, inside the root Vue instance (thedivelement with idapp), we refer to this component by its id as if there exists a legit HTML element calledgame-title. -
The second argument is a configuration object, with same options as
new Vue, such asdata,computed,watch,methods, and lifecycle hooks. The only exceptions are a few root-specific options likeel.
To avoid name clashing with existing and future HTML element tag names, component names are often multi-word and hyphen-separated.
Template
You might have noticed that we put what was inside
<h1>
element into the
template
field of
game-title
component.
template
is a string template to be used as the markup for the Vue instance. The template will replace the mounted element.
In this case, the mounted element is
<game-title></game-title>
which will be replaced by the
<h1><a>...</a></h1>
.
Back quotes make writing a multi-line string much easier and is often used for template.
Props
Components become much more powerful if we can customize it. This is where props come in. Think a component as a function, then you can view props as arguments passed from caller (parent element).
As an exercise, consider what are the props needed for the welcome message we displayed under the title.
One possible set of props for welcome message is a
message
and a
playerNames
.
Alternatively, you can also pass the final text to be displayed as a single prop, but that puts more logic in the root instance and often create clutter.
Vue.component('welcome-message', {
    props: {
        'message': String,
        'playerNames': {
            type: Array,
            default: [],
        }
    },
    template: `
        <p>
          {{ message }} {{playerNames.join(', ')}}
        </p>
    `,
});
<div id="app" v-bind:class="['w-100', 'h-100', 'p-5', 'd-flex', 'flex-column', 'align-items-center']">
    <game-title></game-title>
    <welcome-message :message="message" :player-names="playerNames"></welcome-message>
Prop Registration
Props are custom attributes you can register on a component. When a value is passed to a prop attribute, it becomes a property on that component instance.
For example, we register a
message
prop in the
welcome-message
component by include a
'message'
field inside the
props
option with its type
String
.
'message': String
is actually a shorthand for
{ 'message': { type: String }
. In addition, you can specify a default for a prop in the case this prop is not passed, like we used an empty array for
playerNames
.
- Default and Type of prop can both be specified by a function, read more at Props.
-
It is possible to specify the props by
{ props: ['message', 'playerNames']}. However, this approach is discouraged as it disallows specifying the type and default of each prop.
Prop Passing
To provide a prop to a component, you can pass data to it as if it is a normal HTML attribute. For example, in
<welcome-message :message="message" :player-names="playerNames"></welcome-message>
, we use data binding to provide both
message
and
playerNames
as props.
Prop Casing
You might have noticed the casing for
playerNames
isn't consistent. In HTML file, when using as a custom HTML attribute, it becomes
player-names
.
That is because HTML attribute-name are case-insensitive, so browsers will interpret any uppercase characters as lowercase. That means when you’re using in-DOM templates, camelCased prop names need to use their kebab-cased (hyphen-delimited) equivalents. For example,
playerNames
becomes
player-names
in template.
Reactivity in Props
Note thesetTimeout
code is still functioning even after we factored the welcome message into a component. This is because when props' value changed, Vue engine efficiently 'regenerates' the component using the new props values.
Data
Similar to classes in other programming languages, a component often has
state
To ensure multiple component instances each can maintain an independent copy of the state, data option in component must be a function.
Make the following changes and reload the page. You should see two checkbox switches, does clicking the first switch intefere with the other?
<div id="app" v-bind:class="['w-100', 'h-100', 'p-5', 'd-flex', 'flex-column', 'align-items-center']">
    <game-title></game-title>
    <welcome-message :message="message" :player-names="playerNames"></welcome-message>
    <template v-if="playerNames.length">
        <ready-checkbox :name="playerNames[0]"></ready-checkbox>
        <ready-checkbox :name="playerNames[1]"></ready-checkbox>
    </template>
Vue.component('ready-checkbox', {
    props: {
        'name': String,
    },
    data: function() {
        const id = `ready-switch-for-${this.name}`;
        return {
            checked: false,
            id
        };
    },
    template: `
        <div class="custom-control custom-switch">
            <input type="checkbox" class="custom-control-input" :id="id" :checked="checked">
            <label class="custom-control-label" :for="id">{{name}}, are you ready?</label>
        </div>
    `,
});
-
Since
data
is a function, you can also put some component logic here like binding the
idvariable. However, as you will soon see, there often is a better place to put it. -
{ ..., id }is an object initializer shorthand notation introduced in ECMAScript 2015 . It uses the variable name as the key and the variable value as the value.
Conditonal Rendering
v-if
In the previous code snippet, we also used another directive
v-if
which, as its name suggests, conditionally render a block. The block (the DOM subtree from which
v-if
is attached) will only be rendered if the directive’s expression returns a truthy value.
It is also possible to add anelse blockwithv-else:
    <template v-if="playerNames.length">
        <ready-checkbox :name="playerNames[0]"></ready-checkbox>
        <ready-checkbox :name="playerNames[1]"></ready-checkbox>
    </template>
    <div v-else>
        <div class="spinner-grow text-primary" role="status">
            <span class="sr-only">Loading...</span>
        </div>
    </div>
Refresh the page, you should see a loading icon before the switches appear.
There is also
v-else-if
which can be chained multiple times as an
else if block
for
v-if
:
Note how we have used the
<template> element
to group the two
ready-checkbox
components. Consequently, we can apply
v-if
to toggle more than one element.
Think of a template as a content fragment that is being stored for subsequent use in the document. While the parser does process the contents of the
<template>
element while loading the page, it does so only to ensure that those contents are valid; the element's contents are not rendered, however.
Therefore,
<template>
element becomes a convenient invisible wrapper for Vue that holds the enclosing HTML segment until the rendering condition evaluates to true.
v-show
Another option for conditionally displaying an element is the
v-show
directive. The usage is largely the same. (
The folowing is the same code written using v-show
)
<div v-show="playerNames.length">
    <ready-checkbox :name="playerNames[0]"></ready-checkbox>
    <ready-checkbox :name="playerNames[1]"></ready-checkbox>
</div>
<div v-show="!playerNames.length">
    <div class="spinner-grow text-primary" role="status">
        <span class="sr-only">Loading...</span>
    </div>
</div>
The difference is that an element withv-showwill always be rendered and remain in the DOM;v-showonly toggles the display CSS property of the element.
v-if vs v-show
From official guide
v-if vs v-show
v-showdoesn’t support the element, nor does it work with v-else.v-ifisrealconditional rendering because it ensures that event listeners and child components inside the conditional block are properly destroyed and re-created during toggles.v-ifis also lazy: if the condition is false on initial render, it will not do anything - the conditional block won’t be rendered until the condition becomes true for the first time.- In comparison,
v-showis much simpler - the element is always rendered regardless of initial condition, with CSS-based toggling.- Generally speaking,
v-ifhas higher toggle costs whilev-showhas higher initial render costs. So preferv-showif you need to toggle something very often, and preferv-ifif the condition is unlikely to change at runtime.
Current Code after some refactoring
Since we have made a lot of changes, to keep you on track, we post both refactored files here for reference.
<!DOCTYPE html>
<html lang="en">
<head>
    <!-- Required meta tags -->
    <meta charset="utf-8">
    <title>Tic-Tac-Toe</title>
    <meta name="viewport" content="width=device-width, initial-scale=1, shrink-to-fit=no">
    <!-- Bootstrap CSS -->
    <link rel="stylesheet" href="https://stackpath.bootstrapcdn.com/bootstrap/4.4.1/css/bootstrap.min.css" integrity="sha384-Vkoo8x4CGsO3+Hhxv8T/Q5PaXtkKtu6ug5TOeNV6gBiFeWPGFN9MuhOf23Q9Ifjh" crossorigin="anonymous">
    <!-- Always give your HTML file an appropriate title -->
    <meta http-equiv="X-UA-Compatible" content="IE=Edge">
    <style>
        html, body {
            width: 100%;
            height: 100%;
        }
    </style>
</head>
<body>
    <!-- Mounting element for the Vue instance later created with new Vue -->
    <div id="app" :class="appClasses">
        <game-title></game-title>
        <welcome-message :message="message" :player-names="playerNames"></welcome-message>
        <template v-if="playerNames.length">
            <ready-checkbox :name="playerNames[0]"></ready-checkbox>
            <ready-checkbox :name="playerNames[1]"></ready-checkbox>
        </template>
        <div v-else>
            <div class="spinner-grow text-primary" role="status">
                <span class="sr-only">Loading...</span>
            </div>
        </div>

        <div id="board" :class="boardClasses" :style="boardStyles">
            <div v-for="r of 3" :key="`row-${r}`" :class="boardRowClasses">
                <div
                    v-for="c of 3"
                    :key="`cell-${r}-${c}`"
                    :id="(r - 1) * 3 + c"
                    :class="[{'bg-white': [2, 4, 6, 8].includes((r - 1) * 3 + c)} ,boardCellClasses]">
                </div>
            </div>
        </div>
    </div>

    <!-- Optional JavaScript -->
    <!-- jQuery first, then Popper.js, then Bootstrap JS -->
    <script src="https://code.jquery.com/jquery-3.4.1.slim.min.js" integrity="sha384-J6qa4849blE2+poT4WnyKhv5vZF5SrPo0iEjwBvKU7imGFAV0wwj1yYfoRSJoZ+n" crossorigin="anonymous"></script>
    <script src="https://cdn.jsdelivr.net/npm/popper.js@1.16.0/dist/umd/popper.min.js" integrity="sha384-Q6E9RHvbIyZFJoft+2mJbHaEWldlvI9IOYy5n3zV9zzTtmI3UksdQRVvoxMfooAo" crossorigin="anonymous"></script>
    <script src="https://stackpath.bootstrapcdn.com/bootstrap/4.4.1/js/bootstrap.min.js" integrity="sha384-wfSDF2E50Y2D1uUdj0O3uMBJnjuUD4Ih7YwaYd1iqfktj0Uod8GCExl3Og8ifwB6" crossorigin="anonymous"></script>
    <!-- Include Vue from a CDN -->
    <!-- development version, includes helpful console warnings -->
    <script src="https://cdn.jsdelivr.net/npm/vue/dist/vue.js"></script>
    <!-- the following script requires Vue to be imported so comes after -->
    <script src="tic-tac-toe.js"></script>
</body>
</html>
// this is how to create a component that is globally registered
Vue.component('game-title', {
    template: `
        <h1>
            <a href="https://en.wikipedia.org/wiki/Tic-tac-toe">Tic Tac Toe</a>
        </h1>
    `,
});

Vue.component('welcome-message', {
    props: {
        'message': String,
        'playerNames': {
            type: Array,
            default: () => [],
        }
    },
    template: `
        <p>
          {{ message }} {{playerNames.join(', ')}}
        </p>
    `,
});

Vue.component('ready-checkbox', {
    props: {
        'name': String,
    },
    data: function() {
        const id = `ready-switch-for-${this.name}`;
        return {
            checked: false,
            id
        };
    },
    template: `
        <div class="custom-control custom-switch">
            <input type="checkbox" class="custom-control-input" :id="id" :checked="checked">
            <label class="custom-control-label" :for="id">{{name}}, are you ready?</label>
        </div>
    `,
});


const app = new Vue({
    el: '#app',
    data: {
        message: 'Welcome to the game!',
        playerNames: [],
        appClasses: ['w-100', 'h-100', 'p-5', 'd-flex', 'flex-column', 'align-items-center'],
        boardClasses: ['container', 'm-auto', 'bg-light', 'd-flex', 'flex-column'],
        boardStyles: { 'width': '900px', 'height': '900px' },
        boardRowClasses: ['board-row', 'row', 'flex-grow-1'],
        boardCellClasses: ['board-cell', 'col', 'p-4', 'border', 'border-primary', 'rounded-lg'],
    },
});


window.setTimeout(() => {
    app.message = 'Ready to get started?';
    app.playerNames.push('Alice', 'Bob');
}, 1000);
Computed Properties and Methods
Computed Properties
In-template expressions are very convenient, but they are meant for simple operations. Putting too much logic in your templates can make them bloated and hard to maintain.
For example, the welcome message is composed from two template expressions. This approach becomes hard to maintain and inefficient if we need to display the welcome message multiple times. To both refactor the code and cache the result to benefit reusing, we could use a computed property .
    Vue.component('welcome-message', {
        props: {
            'message': String,
            'playerNames': {
                type: Array,
                default: () => [],
            }
        },
        computed: {
            // a computed getter
            messageToPlayers() {
                // `this` points to the vm instance
                if (this.playerNames.length) {
                    return `${this.message} ${this.playerNames.join(', ')}`;
                } else {
                    return this.message;
                }
            }
        },
        template: `
            <p>
              {{ messageToPlayers }}
            </p>
        `,
    });
messageToPlayers is defined as a function using the ECMAScript 2015 method definition shorthand.
In
welcome-message
componnet, we have declared a computed property
messageToPlayers
as a function in
computed
options.
Computed properties can be bound in templates just like a normal property. Vue is aware that
messageToPlayers
is dependent on the reactive properties used in its method definition, namely,
message
and
playerNames
. Therefore, Vue engine will update any bindings that depend on
messageToPlayers
when
message
and
playerNames
changes, like in the case of
setTimeout
.
Computed properties are cached based on their reactive dependencies. A computed property will only re-evaluate when some of its reactive dependencies have changed. This means as long asmessageandplayerNameshas not changed, multiple access to themessageToPlayerscomputed property will immediately return the previously computed result without having to run the function again.
Why do we need caching? Imagine we have an expensive computed property A , which requires looping through a huge Array and doing a lot of computations. Then we may have other computed properties that in turn depend on A . Without caching, we would be executing A ’s getter many more times than necessary! In cases where you do not want caching, use a method instead.
Further readings:
Methods
With the help of Methods , we can separate the logic and template for game board from the root Vue instance .
<div id="app" :class="appClasses">
    <game-title></game-title>
    <welcome-message :message="message" :player-names="playerNames"></welcome-message>
    <template v-if="playerNames.length">
        <ready-checkbox :name="playerNames[0]"></ready-checkbox>
        <ready-checkbox :name="playerNames[1]"></ready-checkbox>
    </template>
    <div v-else>
        <div class="spinner-grow text-primary" role="status">
            <span class="sr-only">Loading...</span>
        </div>
    </div>
    <game-board></game-board>
</div>
Vue.component('game-board', {
    data: function() {
        return {
            classObject: ['container', 'm-auto', 'bg-light', 'd-flex', 'flex-column'],
            styleObject: {
                'width': '900px',
                'height': '900px'
            },
            boardRowClasses: ['board-row', 'row', 'flex-grow-1'],
            boardCellClasses: ['board-cell', 'col', 'p-4', 'border', 'border-primary', 'rounded-lg'],
        };
    },
    methods: {
        boardRowKey(r) {
            return `row-${r}`;
        },
        boardCellKey(r, c) {
            return `cell-${r}-${c}`;
        }
    },
    template: `
        <div id="board" :class="classObject" :style="styleObject">
            <div v-for="r of 3" :key="boardRowKey(r)" :class="boardRowClasses">
                <div
                    v-for="c of 3"
                    :key="boardCellKey(r, c)"
                    :id="(r - 1) * 3 + c"
                    :class="[{'bg-white': [2, 4, 6, 8].includes((r - 1) * 3 + c)} ,boardCellClasses]">
                </div>
            </div>
        </div>
    `
});
const app = new Vue({
    el: '#app',
    data: {
        message: 'Welcome to the game!',
        playerNames: [],
        appClasses: ['w-100', 'h-100', 'p-5', 'd-flex', 'flex-column', 'align-items-center'],
    },
});
Methods are registered by putting the function in the
methods
options. It can then be called directly using its name in template, for example,
:key="boardRowKey(r)"
and as a property of Vue instance by
this.<method-name>
Watchers (optional reading)
While computed properties are more appropriate in most cases, there are times when a custom watcher is necessary. That’s why Vue provides a more generic way to react to data changes through the
watch
option. This is most useful when you want to perform asynchronous or expensive operations in response to changing data.
Official Guide on Watchers
Event Handling
Setup
For this part of the prelab and also for making your debugging process for Vue smoother, please add Vue Devtools as an extension to your browser.
By default, the extension does not support File URLs, so either enable
Allow access to file URLs
in extension setting page or serve the folder locally using
npx
. Refer to the
Piazza post for Assignment1 FAQ
.
Native Events
Listening to events
Asssume you have added the Vue Devtools extension in Chrome, reload the page and inspect on the checkbox switch for Alice in Vue tab.
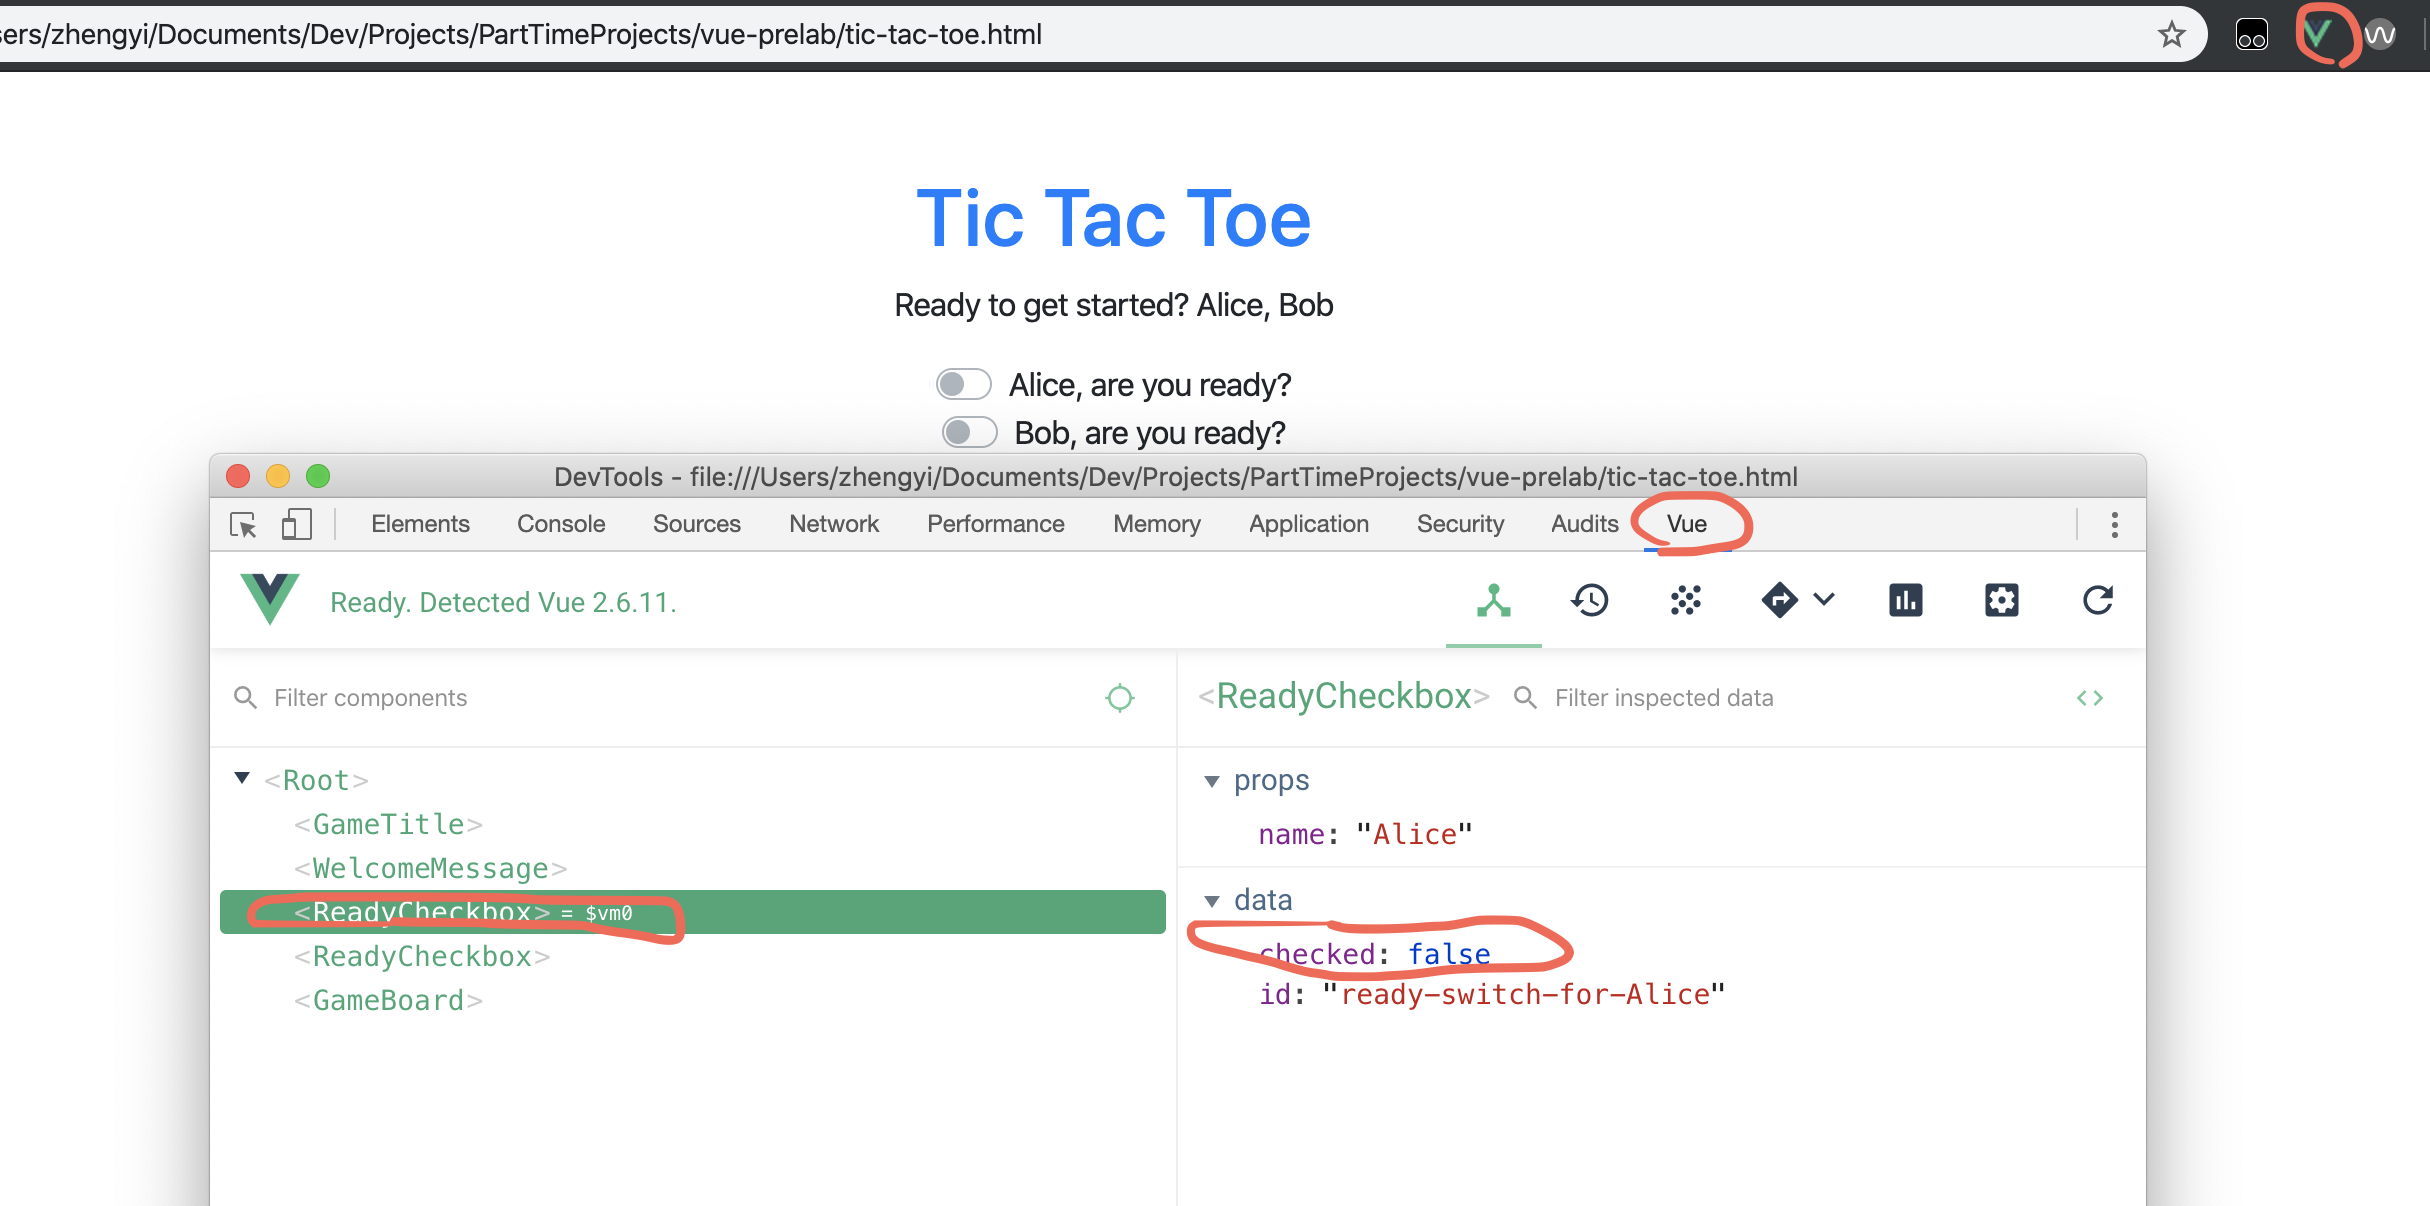
-
Will the
checkedvalue change when you toggle the switch? -
Refresh the page, now change the
checkedvalue fromfalsetotruein Vue Devtools without actually clicking the switch, will the switch state change?
You will notice the data binding is one-way, namely from Vue Instance data to HTML template. In other words, HTML template (what is rendered) will respond to the changes in your Vue instance but Vue instance will not update its variables depending on HTML template state.
Recall on assignment2, what you used to change the Javascript variable when pause checkbox is checked?
The answer is
Events
. And Vue provides a way to use
v-on
directive to listen to the DOM events, pretty much like the
onclick
,
onerror
handlers you used in previous assignments and labs.
template: `
    <div class="custom-control custom-switch">
        <input type="checkbox" class="custom-control-input" :id="id" :checked="checked" @click="checked = !checked">
        <label class="custom-control-label" :for="id">{{name}}, are you ready?</label>
    </div>
`
Update your template for
ready-checkbox
, the only different is the addition of
@click="checked = !checked"
Do the previous two experiments, is the behavior expected?
@
is a shorthand for
v-on:
and we are telling the Vue Engine that when the checkbox is clicked, the
checked
variable should also be changed to its opposite value.
Use Methods as Event Handlers
The logic for many event handlers will be more complex though, so keeping your JavaScript in the value of the v-on attribute isn’t feasible. That’s why v-on can also accept the name of a method you’d like to call.
Make the following changes to
ready-checkbox
. Do you get same behaviors?
Vue.component('ready-checkbox', {
    props: {
        'name': String,
    },
    data: function() {
        const id = `ready-switch-for-${this.name}`;
        return {
            checked: false,
            id
        };
    },
    methods: {
        onClick(event) {
            this.checked = event.target.checked;
        }
    },
    template: `
        <div class="custom-control custom-switch">
            <input type="checkbox" class="custom-control-input" :id="id" :checked="checked" @click="onClick">
            <label class="custom-control-label" :for="id">{{name}}, are you ready?</label>
        </div>
    `,
});
Note how we used
event
variable similar as in a normal Javascript event handler.
It is also possible to use
Event Modifiers
to call functions like
event.preventDefault()
or
event.stopPropagation()
in the template. There are also
Key Modifiers
to check for specific keys in keyboard events.
Custom Events
However, there are cases where native events do not suffice, often when communicating from components to components. For parent-to-child component relationship, we solved this problem with Props . What should we use for the inverse child-to-parent relationship where a child compnent wants to mutate the state of a parent component?
For a legitimate use, consider only showing the board when both parties responded that they are ready.
The answer is again Events , but this time we will use Custom Events .
Emiting A Custom Event
Firstly, we will use
$emit
to trigger an event.
    onClick(event) {
        this.checked = event.target.checked;
        this.$emit('player-ready', this.name, this.checked);
    }
Any additional arguments will be passed into the listener’s callback function.
Note we use kebab-case for custom event names to be comliant with HTML standards. You always use kebab-case for event names.
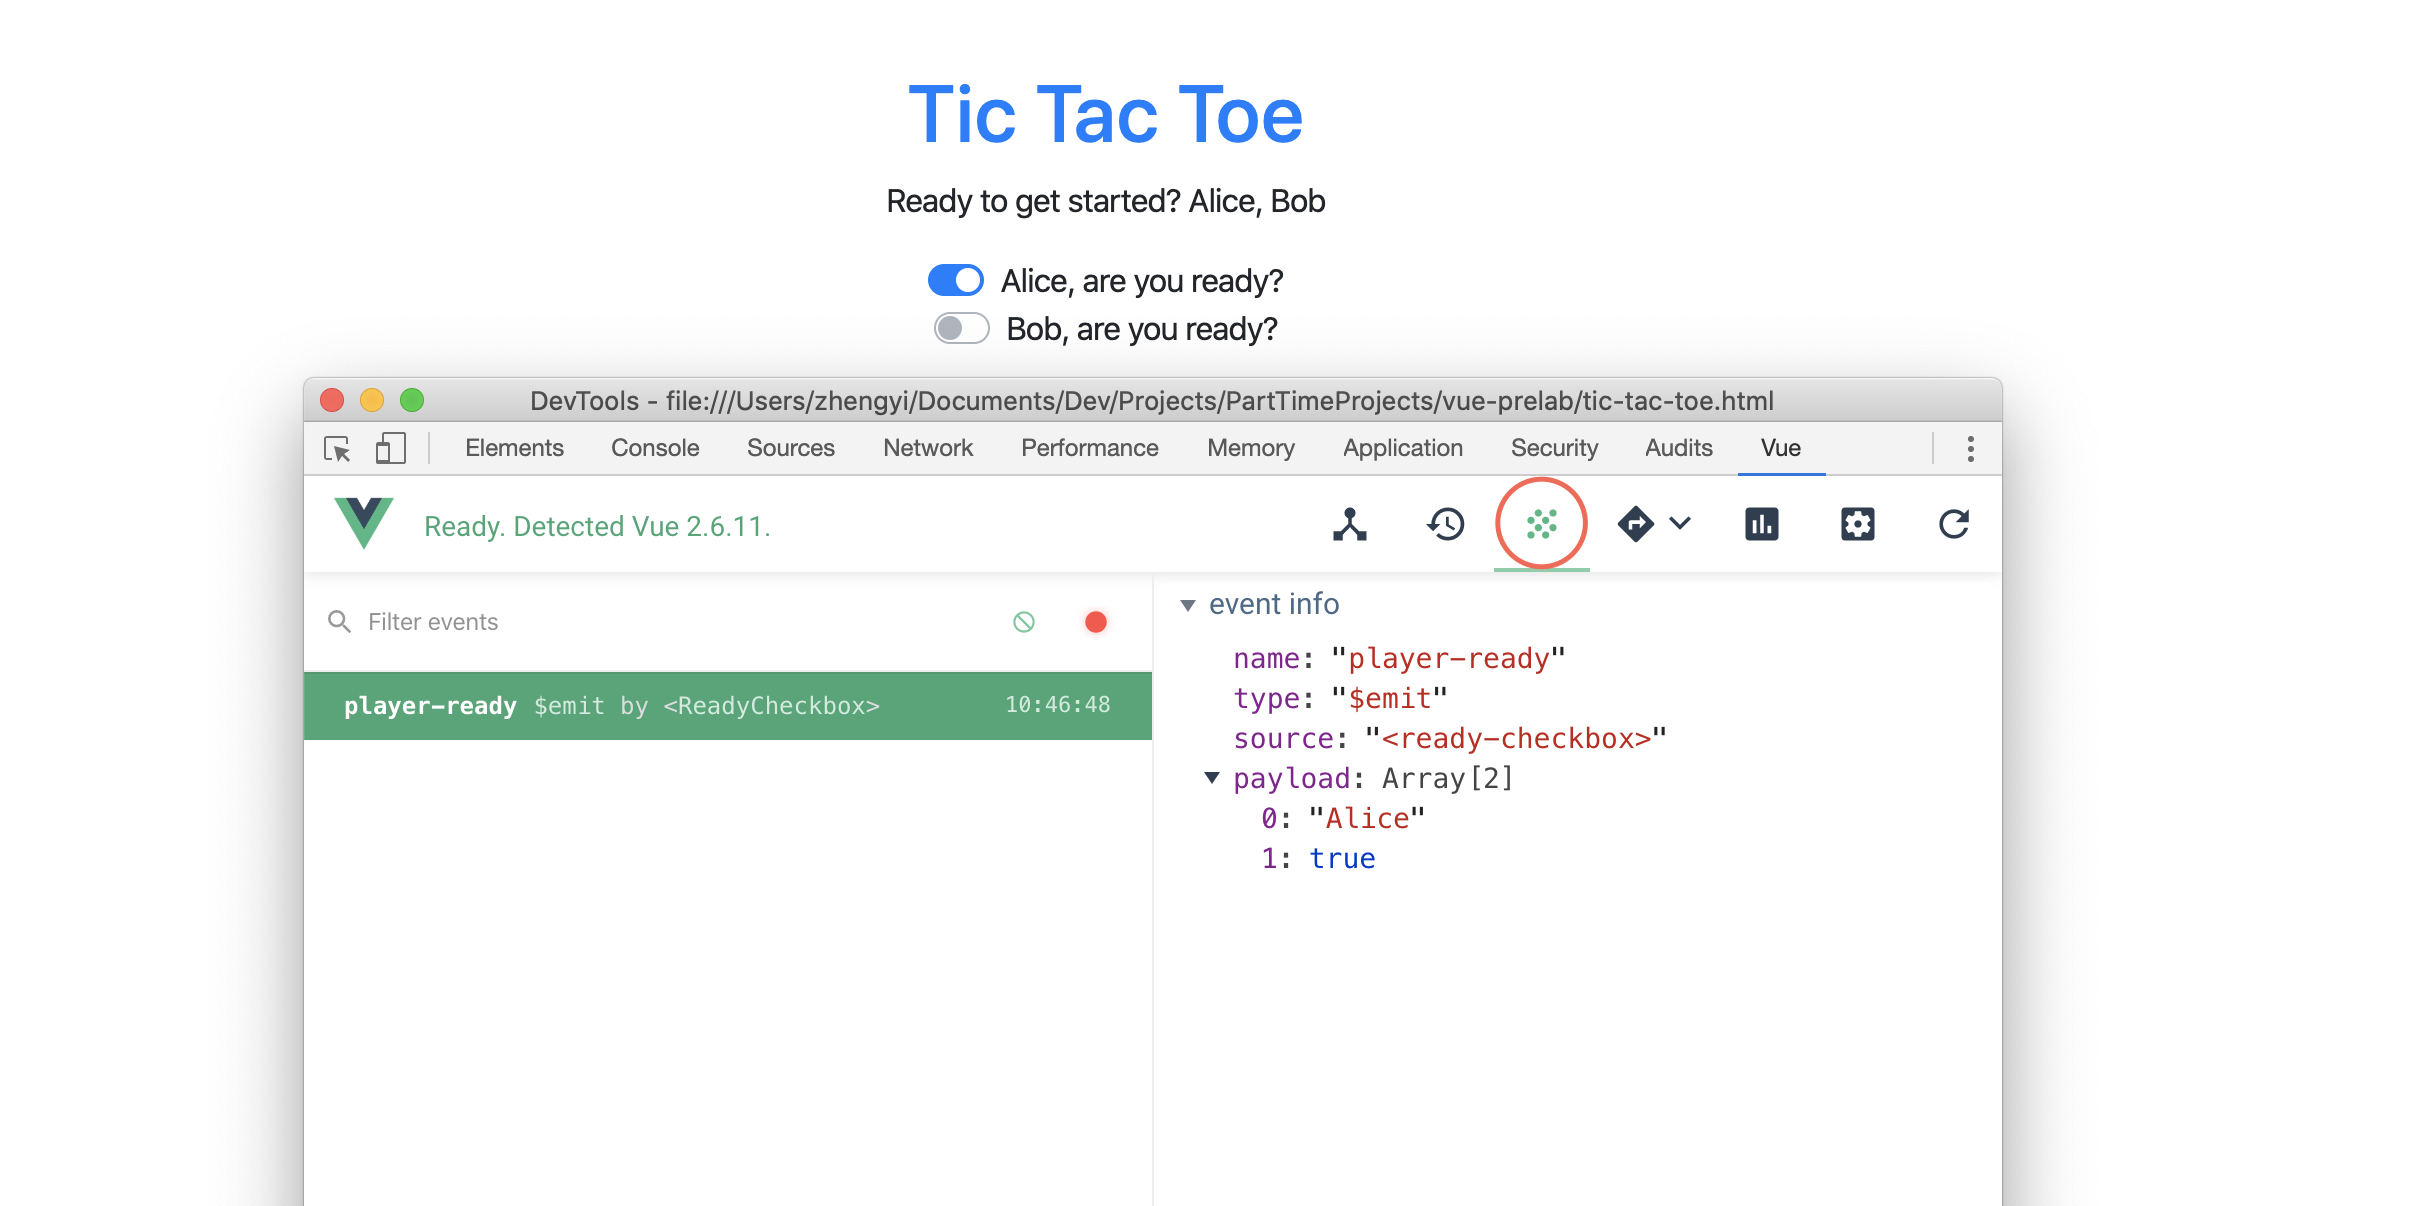
If you refresh the page and click on the switch, you should be able to view the
player-ready
event in the Vue extension.
Listening to Custom Event
For listening to a event, we can use the same procedure as it is a native event.
Try implementing this on your own and look at our answer as reference after you finished.
<div id="app" :class="appClasses">
    <game-title></game-title>
    <welcome-message :message="message" :player-names="playerNames"></welcome-message>
    <template v-if="playerNames.length">
        <ready-checkbox :name="playerNames[0]" @player-ready="onPlayerReady"></ready-checkbox>
        <ready-checkbox :name="playerNames[1]" @player-ready="onPlayerReady"></ready-checkbox>
    </template>
    <div v-else>
        <div class="spinner-grow text-primary" role="status">
            <span class="sr-only">Loading...</span>
        </div>
    </div>
    <game-board v-if="bothPlayerReady"></game-board>
</div>
const app = new Vue({
    el: '#app',
    data: {
        message: 'Welcome to the game!',
        playerNames: [],
        appClasses: ['w-100', 'h-100', 'p-5', 'd-flex', 'flex-column', 'align-items-center'],
        playerReady: {}
    },
    methods: {
        onPlayerReady(playerName, isReady) {
            this.$set(this.playerReady, playerName, isReady);
        }
    },
    computed: {
        bothPlayerReady() {
            return this.playerNames.length &&
                this.playerNames.map(playerName => this.playerReady[playerName])
                                .reduce((prevValue, currValue) => prevValue && currValue);
        }
    }
});
-
We used
v-ifto toggle the display of game board. A better design would be also to hide the switches when both players are ready. -
Notice we used
$setto set the object properties. A normalthis.playerReady[playerName] = isReady;will not trigger the re-computation ofbothPlayerReadthere because of limitations of modern Javascript . -
We used
Array.prototype.map()andArray.prototype.reduce().
Last Notes
After working through the sections above, you should be familiar with Vue.js.
There is one task for this prelab:
- Task 1: Complete the steps above. Once you have your tic-tac-toe game set up (but not functional yet), create a zip of your code folder and upload to Gradescope Please note that you'll have to submit it to gradescope this time or we'll not be able to grade your submission.
The tic-tac-toe game is not completed yet, but you have got all the pieces to make it working. Try finishing implementing it yourself! You will be asked to include your finished tic-tac-toe game as part of the submission for assignment 3.
This is the end of the prelab! It is a lot to digest, so if you're confused about anything, feel free to come to TA Hours.