Welcome to Code Bubbles. This guide will help you to setup and install Code Bubbles. (Note that some of the windows might appear slightly different in that bubbles keep evolving). Eclipse should not be running before this process starts. Note you will need to have Eclipse 3.5 or higher for things to work correctly. (At least it hasn't been tested with prior versions of Eclipse.)
- Double click on bubbles.jar to start the installation process.
If a "main class not found" error appears run the jar with:
java -jar jarname
- A Bubbles Environment Setup window will pop up in the upper left corner of your screen.
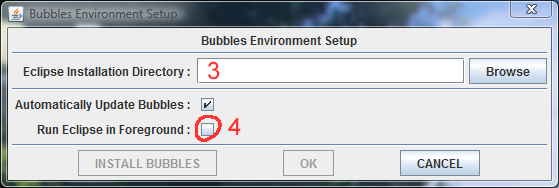
- Click Browse and navigate to your Eclipse Installation Directory
(this should be the directory that contains your eclipse binary or, for the Mac, the
Eclipse.app file/directory).
- If you would like to be able to view eclipse while running Code Bubbles then check Run Eclipse in Foreground.We recommend you do not check this option as our goal is to make Code Bubbles a stand alone environment and enable all features from within Bubbles. However, the option is supported.
- Click Install Bubbles.
- Click Ok.
- A Bubbles Workspace Setup window will appear in the upper left corner of your screen.
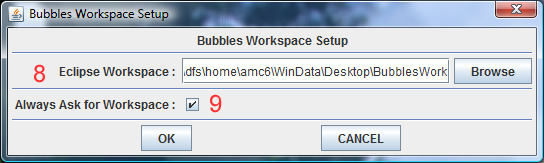
- Click Browse and navigate to your Eclipse Workspace. The workspace should have been setup by Eclipse and include at least one project. If the workspace is not setup, Code Bubbles will attempt to have Eclipse set up a new project.
- If you want this to be your default workspace, you can uncheck Always Ask for Workspace.
- Click Ok
- A User Metrics Option window will appear.
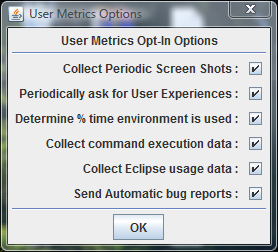
- You may choose to disable any of the options listed. The metrics are being used to determine how Code Bubbles is actually used and how it can be improved. We recommend that you at least enable automatic bug reports since these contain no proprietary information and are very helpful for our improving the quality of the environment..
- Click Ok.
- Code Bubbles will now startup. Please be patient. Code Bubbles must first load Eclipse and the symbol tables for your projects. The first time it starts, the system also needs to cache JavaDoc information from the web.
- Code Bubbles is now ready to use. Next time you start Code Bubbles, all you will need to do is choose your workspace (unless you set it to default to the specified one)..
- If you have a downloaded version of Java docs on your system, it is recommended that you edit the file ~/.bubbles/Bdoc.props and replace the entry for key Bdoc.javadoc.0 with the url of that verison, i.e. file://pro/java/linux/jdk1.6/docs/api/
Recommended Hardware:
- Processor: Dual Core
- Graphics Card: Nvidia 8600 or higher
- Memory: 2GB
Tested On:
- Windows Vista, Window 7
- Debian GNU/Linux
- Mac OS X 10.6, 10.7
For more information visit our website: http://www.cs.brown.edu/people/spr/codebubbles/
Copyright 2010 Brown University. All Rights Reserved.